Showing posts with label tips. Show all posts
Showing posts with label tips. Show all posts
Tuesday, October 20, 2009
Linkpool: TortoiseSVN and Password to SVN
TortoiseSVN does not allow save password to SVN. This forces entering it many times during the day. Fortunately there is a workaround and Ditching the Password Prompts in TortoiseSVN explains how.

Thursday, October 15, 2009
What is MaxBuild Property in .inf File for Cabwiz is Actually For
When installing cab file on devices that have square screens or support screen rotation (last is applicable to all devices starting from WM 2003 SE) you may receive an error message:
The program you have installed may not dispay properly because it was designed for a previous version of Windows Mobile software.
Text of this message is not really correct because actually cab installer complains about screen on WM, not OS version.
To omit this error MaxBuild property declared in Vestion section of .inf file can be used. According to Microsoft:
The BuildMax value can be used to indicate that the application supports square screens (BuildMax=0xA0000000), screen rotation (BuildMax=0xC0000000), or both (BuildMax=0xE0000000).
This is one of those odd things that we can found in sometimes. Error message leads us to wrong direction and name of property doesn't have any connection to what it does :)
Wednesday, October 14, 2009
Hard Reset HTC S730
Yesterday HTC S730 that I use for development hang and after soft reset I couldn't start it again.
So I had to perform hard reset using special key combination: holding both soft buttons press power button. At first it didn't work. After spending couple of minutes on Internet I found that there is a trick: power button must be pressed only for a second and then released.
After very first try I successfully reset the phone :)
Friday, October 2, 2009
Hiding Applications to Tray
Saturday, September 26, 2009
Disabling MSN in Outlook Express
When Outlook Express starts it automatically starts MSN. But there is a way to stop this behavior:
- Start Registry Edit (Click Start, then Run, type in 'regedit' and click OK).
- Go to HKEY_LOCAL_MACHINE > Software > Microsoft > Outlook Express .
- Create new DWORD value with name "Hide Messenger" and set value to 2.
Now you just need to stop MSN, and restart Outlook Express. You will see that MSN Messenger no longer appear.
Thursday, July 30, 2009
Installing & uninstalling applications on emulator
Story 1. Installing application.
To install application to emulator adb utility will be handy:
- Start emulator.
- Open command prompt (cmd.exe).
- Navigate to "tools" directory in Android SDK.
- Run installation using command "adb install application.apk". For example, "adb install "C:/com.andreware.sample.apk"" when com.andreware.sample.apk is located at root directory on disk C.
- Wait couple of seconds while application is being installing.
Story 2. Uninstalling application.
There two ways to uninstall application from emulator: uninstall like on real device or use adb utility. First way allows to uninstall any application while adb utility will allow to uninstall only application installed using it (including the ones deployed from IDE).
Let's look at first one first. It is pretty simple and straitforward:
- Start emulator.
- On the home screen press the "Menu" button.
- Choose"Settings" item from menu.
- Choose "Applications" item in the settings list.
- Choose "Manage applications".
- Choose application that you want to uninstall.
- In the "Application info" window that will appear click "Uninstall" button.
- Confirm uninstalling.
- Wait a second while application is being uninstalling and click "OK" on next window that says "Uninstall finished".
Second way requires usage of command line and adb utility:
- Start enulator.
- Open command window (cmd.exe).
- Navigate to "tools" directory in Android SDK.
- Run remote shell: "adb shell".
- Goto app directory: "cd /data/app".
- Now you can list installed applications: "ls".
- To uninstall application use "rm" command and appropriate apk file. For example, "rm com.andreware.sample.apk".
- Type "exit" to leave remote shell.
Using Android standard icons in designer
Today I wanted to use standard search icon on one of the buttons. When I want to use custom icon I use Reference Chooser dialog. As a result I have such a reference in a property:
@drawable/search_icon
But Reference Chooser dialog does not provide a way to use standard icon (or I don't see it). Fortunately we can type reference directly to property value either in designer or plane xml. So to use standard drawables "@android:drawable/id" pattern can be used. For example, to set standard search icon I used this reference text:
@android:drawable/ic_menu_search
Wednesday, June 17, 2009
Setup Eclipse for BlackBerry Storm development
I've spent many hours trying to install BlackBerry plug-in v4.7 (needed to develop for Storm) on Eclipse and finally I found solution. As always solution was in one small detail. Here is the whole way to setup environment.
INSTALL J2SE
Download and install Java SE Development Kit. Personally I used JDK, but I think JRE should work as well.
INSTALL ECLIPSE
Download and install (actually unpack) Eclipse IDE for Java Developers if you don't have one. I must say that BlackBerry plug-in for Eclipse contains this IDE, but who knows what version did they pack into plug-in installer.
Download and install (actually unpack) Eclipse IDE for Java Developers if you don't have one. I must say that BlackBerry plug-in for Eclipse contains this IDE, but who knows what version did they pack into plug-in installer.
DOWNLOAD COMPLETE ECLIPSE SOFTWARE UPDATE
Once you checked that your Eclipse is working you need to install BlackBerry Eclipse plug-in. Go to BlackBerry JDE Plug-in for Eclipse and download Full Installer and Eclipse Software Update for the BlackBerry JDE v4.7 Component Pack.
Once you checked that your Eclipse is working you need to install BlackBerry Eclipse plug-in. Go to BlackBerry JDE Plug-in for Eclipse and download Full Installer and Eclipse Software Update for the BlackBerry JDE v4.7 Component Pack.
INSTALL ECLIPSE BLACKBERRY PLUGIN
Install plug-in from Full Installer first. It will ask you to install new Eclipse or specify existing one. Just point to your Eclipse folder and proceed installation process.
Since Full Installer does not provide you with Storm emulator and v4.7 platform you need to install v4.7 Component Pack. RIM web site suggests to install this update using update site. Don't do it. If you already tried to go this as discribed in instructions you will need to perform step 4. Here is correct way to install update:
SETUP ECLIPSE TO USE BLACKBERRY 4.7 JDK
Now you will have 4.7 installed, but not set as default. You need to change default component from 4.5 to 4.7.
To do so you need to:
That's it. Now you can start playing with Eclipse environment for BlackBerry.
Install plug-in from Full Installer first. It will ask you to install new Eclipse or specify existing one. Just point to your Eclipse folder and proceed installation process.
Since Full Installer does not provide you with Storm emulator and v4.7 platform you need to install v4.7 Component Pack. RIM web site suggests to install this update using update site. Don't do it. If you already tried to go this as discribed in instructions you will need to perform step 4. Here is correct way to install update:
- 1. Run Eclipse
- 2. Go to Help > Software_Updates
- 3. Switch to Available_Software tab
- 4. Make sure that you don't have a link to "http://www.blackberry.com/go/eclipseUpdate" there. If you have follow step 4.1 otherwise jump to step 5.
- Remove link to RIM update site using Manage_Sites button.
- 5. Add new site like this:
- Click Add_Site button.
- Click Archive button and select update file downloaded earlier.
- Click OK.
- 6. Check this new node in the list of available software and click Install button.
- 7. Follow instructions in installer.
Now you will have 4.7 installed, but not set as default. You need to change default component from 4.5 to 4.7.
To do so you need to:
- Create new workspace and add BlackBerry project (File > New > Project and pick BlackBerry project).
- Go to BlackBerry > Configure_BlackBerry_Workspace in Eclipse main menu.
- Navigate to BlackBerry_JDE > Installed_Components
- And change component from 4.5 to 4.7
P.S.
There are some problems with simulator under Eclipse. I wrote about this in BlackBerry simulator in Eclipse could work better.
There are some problems with simulator under Eclipse. I wrote about this in BlackBerry simulator in Eclipse could work better.
BlackBerry simulator in Eclipse could work better
Yesterday I finally installed BlackBerry plug-in for Eclipse, but I'm disappointed by simulator integration with IDE.
For some reason BlackBerry simulator does not do it's best when developing using Eclipse. Most of the time I cannot run application twice from Eclipse. I have to restart simulator for second attempt to run my app.
It takes some time. So I found a faster workaround. When I see this kind of problem I:
- rebuild project (Alt+B)
- manually delete application from simulator (Select app in Downloads; Menu > Delete; Click Delete to confirm)
- manually load application to simulator (File > Load_Java_Program from simulator menu)
This is much faster then restarting simulator every time problem occurs.
Unfortunately this works only when I don't need to debug code. I still have to restart simulator when debugging.
Thursday, June 11, 2009
External web camera can break your VMWare
Be careful with web cameras and VMWare. This string I needed to buy and install web camera since my laptop doesn't have one. And this simple step led to problems with using VMWare Workstation.
Luckily there a simple fix for the issue found at VMWare Communities:1) Dont play or install any VMware Software.1) After installation search for FixCamera.exe and delete it. (generally installed in folder Windows).2) Run msconfig (I have Windows XP SP2) and in the Start tab, uncheck FixCamera.My Web Cam's software still works fine without FixCamera.exe
Friday, May 22, 2009
How to bring back "File Explorer" window in Eclipse DDMS
I accidentally closed File Explorer in DDMS view in Eclipse. Unfortunately I couldn't just use context menu to bring it back. It takes a longer way to fix such a mistake.
You'll have to do this using main menu:
You'll have to do this using main menu:
- Window > Show View > Other...
- Under "Android" node there is "File Explorer"
- Select it and click OK.
Monday, March 23, 2009
Handling move from Rails 2.2.2 to 2.3.2 version
As I preffer to work on virtual machines (by the way my personal choice is VMware) I used one of them while getting in touch with Rails. I had version 2.2.2 installed there.
Today I created a new VM for working with Rails and found out that 2.3.2 version of Rails appeared there as a result of installation. New version of Rails arrived :)
Unfortunally I was not able to run any of my demos :(
To fix this issue I started with change in "config/environment.rb" by updating
RAILS_GEM_VERSION = '2.2.2' unless defined? RAILS_GEM_VERSION
to
RAILS_GEM_VERSION = '2.3.2' unless defined? RAILS_GEM_VERSION
Then I had to run "rake rails:update".
Thats it. These two steps brought demos to life :)
Today I created a new VM for working with Rails and found out that 2.3.2 version of Rails appeared there as a result of installation. New version of Rails arrived :)
Unfortunally I was not able to run any of my demos :(
To fix this issue I started with change in "config/environment.rb" by updating
RAILS_GEM_VERSION = '2.2.2' unless defined? RAILS_GEM_VERSION
to
RAILS_GEM_VERSION = '2.3.2' unless defined? RAILS_GEM_VERSION
Then I had to run "rake rails:update".
Thats it. These two steps brought demos to life :)
Tuesday, February 24, 2009
"services.exe" virus
Today when going to the web site of Nissan dealer present in my city I've got a virus. What it does is sending e-mails from my machine. Pretty unexpected situation.
Unfortunaly my antivirus did not stop it, but I found solution in a couple of minutes:
Unfortunaly my antivirus did not stop it, but I found solution in a couple of minutes:
- With the help of Task Manager I found additional services.exe running on the machine. The file was located at "C:\Windows\services.exe".
- Since Windows thinks that this virus is a system component it does not allow to stop it. I used CopyLock application to remove it at the next system start.
- Finally I removed this services.exe from the system startup list.
Wednesday, January 28, 2009
Mistical trojan mmmsfusf.dll
Two days ago for some reason my computer stopped working as expected. Every time I was open results of Google search a page to arclane.com opened. I scaned computer with antivirus and took a look in internet. But it didn't help much. Unfortunally I didn't have much time and decided to come back to the problem at the end of this week.
And guess what happened today? A compete nightmare every time I used my internet browser (which is IE 5) it took forever to open a page. Just like in old times of dial-up.
I couldn't live with such a problem even a day. After some inverstigation I found a dll called mmmgfwgf.dll in my system32 directory. Creation date + strange name + search in google.com = looks like it is my problem. And again I found just a little information. Actually I found just one link: http://www.threatexpert.com/report.aspx?md5=4d013b3b1e327cc9582acc74f65ac150. It explains what this, but there were nothing about repairing the system.
My first try to remove this trojan finished with the crash of system. Fortunally I created an image before starting experimenting.
Second try was much better:
And guess what happened today? A compete nightmare every time I used my internet browser (which is IE 5) it took forever to open a page. Just like in old times of dial-up.
I couldn't live with such a problem even a day. After some inverstigation I found a dll called mmmgfwgf.dll in my system32 directory. Creation date + strange name + search in google.com = looks like it is my problem. And again I found just a little information. Actually I found just one link: http://www.threatexpert.com/report.aspx?md5=4d013b3b1e327cc9582acc74f65ac150. It explains what this, but there were nothing about repairing the system.
My first try to remove this trojan finished with the crash of system. Fortunally I created an image before starting experimenting.
Second try was much better:
- First of all I used CopyLock to remove mmmsfusf.dll from system32.
- Then I changed value of "AppInit_DLLs" registery value that is located in "HKEY_LOCAL_MACHINE\SOFTWARE\Microsoft\Windows NT\CurrentVersion\Windows". I simply removed path to mmmsfusf.dll from it.
- And finally I removed "HKEY_CURRENT_USER\Software\Microsoft\WinPathCRC" key.
Saturday, January 10, 2009
Using VMWare on computer with wide screen
I'm using VMWare for development for years now. I started using it when I had to work simalteniously on several projects that required different versions of same development tools.
I liked it very much so later on I decided to use VMWare at my home laptop as well. But with the great benefit one issue arised. I used to work in my virtual machines using full screen mode. The thing is that at my work I had a PC with regular 4:3 display (at least it was regular size four years ago), but my laptop has a widescreen. For some reason resolutions for widescreens are not available in virtual machine (in my case it should be 1280x800).
After some surfing in the Web and several trials I finally found a solution that works. Today I set up new VM from scratch and ancountered same issue. So I decided to post this solution on the Web. I hope this will help you to save some time solving the same issue.
Here is the solution:
I liked it very much so later on I decided to use VMWare at my home laptop as well. But with the great benefit one issue arised. I used to work in my virtual machines using full screen mode. The thing is that at my work I had a PC with regular 4:3 display (at least it was regular size four years ago), but my laptop has a widescreen. For some reason resolutions for widescreens are not available in virtual machine (in my case it should be 1280x800).
After some surfing in the Web and several trials I finally found a solution that works. Today I set up new VM from scratch and ancountered same issue. So I decided to post this solution on the Web. I hope this will help you to save some time solving the same issue.
Here is the solution:
- Start your virtual machine.
- Run "Registry Editor" (Start > Run > regedit.exe) in it.
- Select the registry key HKEY_LOCAL_MACHINE\SYSTEM\CurrentControlSet\Services\vmx_svga\Device0.
- Add a new string-value key for the desired resolution (RightClick > New > String Value) using the form of Resolution.x for the value name. For example: Name = Resolution.0; Value = 1280x800.
- Exit "Registry Editor".
- Shut down your VM.
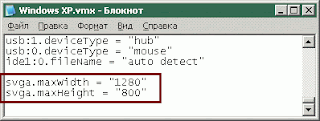
- Add max width and height to "vmx" file of your VM as follows: svga.maxWidth = "1280" and svga.maxHeight = "800". Just open this file using Notepad and add strings at the end like this:
- Uncheck autofit for the guest in VMWare (View > Autofit Guest).
- Start your VM and set new resolution in "Display Properties".
Subscribe to:
Posts (Atom)


 Posts
Posts

